VERNIER HEIGHT GAUGE
Hello guys,
Today, We'll discuss on Vernier Height Gauge.
Lets start discussion on this topic. Hopefully, you'll understand this topic.
First of all, thanks for visiting.
Below topics that are covering:
- INTRODUCTION
- CONSTRUCTION
- FIND OUT THE LEAST COUNT OF VERNIER HEIGHT GAUGE?
- HOW TO USE VERNIER HEIGHT GAUGE CORRECTLY?
INTRODUCTION:
Vernier Height Gauge is a measuring device which is used for measurement of height of any object and marking done by help of scriber. It is based on the principle of "Difference between main scale and vernier scale like "Vernier Caliper". Its least count is 0.02 mm or 0.001".
Vernier Height Gauge is made of stainless steel or mild steel. Its specification is based on beam length. It generally available upto 300 mm of length.
CONSTRUCTION:
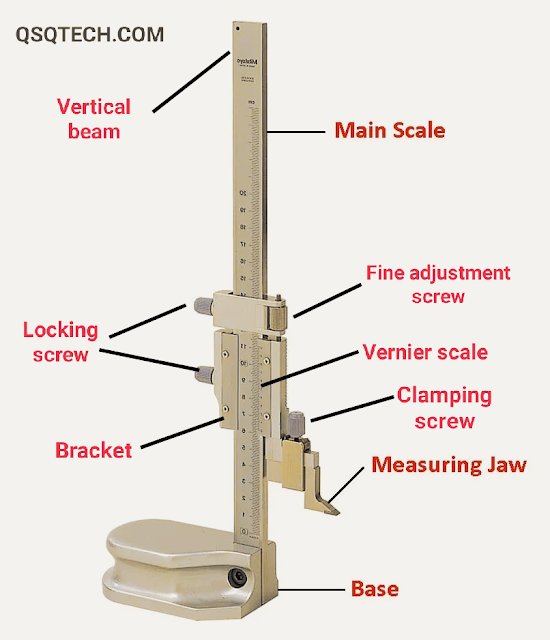
There are many components that are assembled and make this instrument useful in industrial sector.
1. Base
2. Vertical beam
3. Main scale
4. Sliding bar (Bracket)
5. Vernier scale
6. Fine adjustment screw
7. Locking screw
8. Clamp/Clamping screw
9. Scriber
1. Base:-
It is a rigid base that is important role play in balancing all the components assembly of instrument. It provides the datum surface which is given reference for marking.
2. Vertical beam:-
Vertical beam is mounted on rigid base of instrument. Sometimes, it is also known as vertical bar and used to support the main scale.
3. Main scale:-
Main scale is calibrated in inches on the left side of scale. It is calibrated in cm on the right side of scale. It is Vertically attached with Vertical beam.
4. Bracket (Sliding bar):-
It slides on Vertical beam and used to attach the vernier scale and helps to make the vernier scale as a moveable scale. Its one hand is scriber and other hand is fine adjustment screw.
5. Vernier scale:-
Vernier scale has readings at both side (Right side & Left side).
6. Fine adjustment screw:-
This screw is used for adjustment of vernier scale during measurement. It helps to take readings accurately.
7. Locking screw:-
We used locking screw to lock the movement between main scale and vernier scale so that we can easily measure the dimensions of any object. It gives accuracy in taking measuring data.
8. Clamp/Clamping screw:-
Clamp is used to joint the Jaw and sliding bar with help of clamping screw.
9. Scriber:-
Scriber is a tool which is used to mark on object at any dimension/measuring point.
Read also:-
FIND OUT THE LEAST COUNT OF VERNIER HEIGHT GAUGE?
50 vernier scale readings is equal to 49 main scale reading.
Least count = 1 Main scale division - 1 Vernier scale division
1 Main scale division = 1 mm
1 Vernier scale division = 49/50 mm
= 0.98 mm
Least count = 1 mm - 0.98 mm = 0.02 mm
HOW TO USE VERNIER HEIGHT GAUGE CORRECTLY?
1. It should be employed by placing on surface plate.
2. Surface plate should be properly cleaned.
3. To avoid mistakes, readings should be write down in same time.
4. Now, When scribe bottom surface touch surface plate level then zero lines of vernier scale should be coinside with zero line of main scale, both scale (Vernier scale and main scale) having zero line should be coinside to each other or adjusted.
5. Now, we are ready to taking readings on Vernier Height Gauge.
We hope you will understand this topic.
Thank you.
Some important question that you should read to improve skill:-

No comments:
Post a Comment
If you have any doubt, please let me know